A horseshoe game is also known as a pitch and can be played by two people or two teams. This lawn game involves players throwing horseshoes at stakes which are set up in a horseshoe pit.
A horseshoe game is another summer game that is fun for your kids, neighbors, and friends.
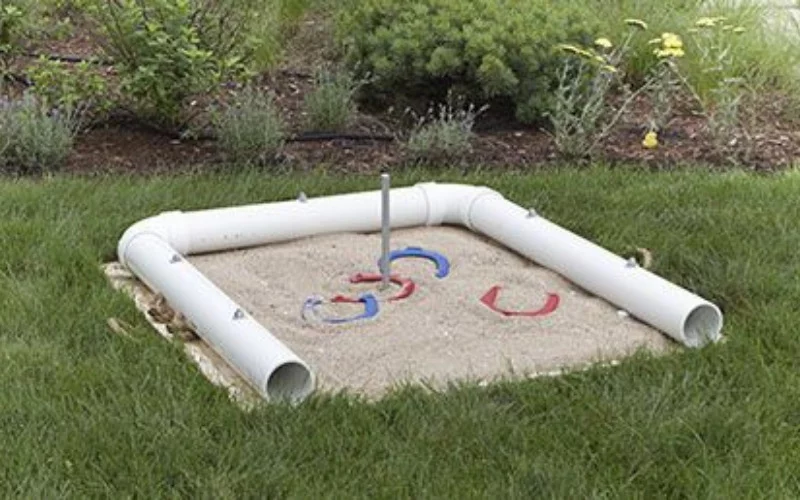
If you have available space in your backyard, you can easily build a horseshoe pit in your backyard using materials around you. We will provide you with a step-by-step guide on making a portable horseshoe pit in your backyard.
What Are the Legal Dimensions of A Horseshoe Pit?
If you have an open space in your yard, you can consider following the legal dimensions of a horseshoe pit.
In a legal horseshoe pit, your takes should be 40 feet apart, and they (your stakes) should reside in a box that measures a minimum of 31 inches by 43 inches and a maximum of 36 inches by 72 inches.
Although most horseshoe pit measures about 36 inches by 48 inches, a rectangle that measures 48 feet by 6 feet should be set aside for the whole game; you have the choice of making one single box even though a standard horseshoe game requires two boxes, one for the stakes and one for pitching.
How Do You Make A Horseshoe Pit?
Making a portable horseshoe pit requires only a few steps, all of which can be easily achieved if you follow the instructions carefully.
First, you will need to measure your space; then, you build your boxes; you will set the boxes up and set your stakes. After that, you can add your sand, and you are ready to go.
How Do You Make A Horseshoe Pit?
Step One: Gather Your Materials
It is important to have all your materials needed to be kept aside in the same location. It prevents you from running around and saves your time. Some of the materials needed to build a horseshoe pit include
- Treated wood
- Mallet
- Screws or fasteners
- Shovel
- Stakes
- Play sand or blue clay
- Saw (circular saw)
All these materials will come in handy during the building process.
Step Two: Measure your Selected Area
You will want to ensure that your selected area is enough to build a horseshoe pit as there is a standard dimension for a horseshoe pit.
You can make your pit simple by just using two stakes that are 40 feet apart from each other and 21 feet away from the front of each box.
Using a measuring tape, you can measure out the 40 feet distance between your stakes and the 21 feet distance between your stakes and the front of the box, use cones or minor stakes to mark out the area measured.
After placing your cones on the measured area, you should have a pit that measures at least 36 by 48 inches.
Step Three: Build your Horseshoe Pit Boxes
Before you build your horseshoe pit boxes, you must confirm if you are using two boxes. If you are using two boxes, you will need eight pieces of wood in total, four 36-inch pieces and four 48-inch pieces. For a single box, you will only need two pieces of each.
Make sure the measurement of your wood is accurate and corresponds with the required length.
Use screws to fasten the frames together. Don’t forget to use protective eyewear and gloves for maximum safety. Drive the screws through the outer part of the area where your wood intersects.
Step Four: Dig your Pit
After making your frame, place it in the designated area and use a stick to outline the frame.
Gently set your frame aside after outlining; you can then start digging with your shovel. You should dig 7 to 8 inches into the ground.
After digging, lower your frame to the ground and adjust it to ensure it is in place.
Step Five: Setting up your Stakes
Your stakes should be placed at least 21 inches away from the front of your box and should be 22 inches into the ground, and only 14 to 15 inches should be left above the surface. You should use a mallet to drive your 1inch diameter metal stake into the wall.
Your metal stake should be tilted a little towards the front of your box to form an angle of 12 degrees.
Your stake should also be firm in the ground and should not cause any accident around. If your horseshoe pit is a permanent feature, you can pour concrete around your stakes; your stakes will be more stable.
Step Six: Fill your Pit with Sand
Fill your horseshoe pit with sand using a sandbag. Make a little cut at the tip of your sandbag and drag it around your horseshoe pit in a spiral movement. Once you have poured out all the sand, use a shovel to pat the sand and even it out gently.
What the Video Below to Learn How to make Portable Horseshoe Pit
What Is the Best Material for A Horseshoe Pit?
While sand is the most used material for a horseshoe pit surface, you can also consider using clay as another alternative. Sand, loose dirt, utility sand, and blue clay are considered the best option for play surfaces, as they prevent bouncing and sliding.
But most horseshoe pots use a kid’s play sand. Kids play sand contains granite and little quartz and can commonly use in children’s sandboxes.
Play sand is cleaner as it has been sifted; it produces less dust than normal sand and stays in place.
When using loose dirt, you may need to refill the sand periodically as it doesn’t stay in place. Blue clay is mostly used in tournaments as it helps your horseshoes to stick and not to bounce.
How Many Bags of Sand Do You Need for A Horseshoe Pit?
For a standard horseshoe put, you may need 5 to 6 bags of sand per pit. It means that if you have two horseshoe pits, you will need a total of 10 to 12 bags of sand.
It is advisable to use a plastic tarp to cover your horseshoe pit after use. This helps to keep the sand in place and prevent it from getting wet. Doing that can also prevent pesky insects from invading your sand pits.
How Deep Should the Sand Be in A Horseshoe Pit?
The sand in your horseshoe pit should be 4 inches deep at a minimum. Some horseshoe pits can contain sand 8. inches deep, but it is mostly for tournament players.
The sand in the horseshoe pit is used to keep your horseshoe in place when it lands. You can choose to make a concrete slab and pour your sand or clay over it; this option is for players who want to make a permanent horseshoe put in their backyard.
What Is the Angle of The Stake in A Horseshoe Pit?
Your stakes are inclined forward a little at not more than 3 inches or 12 degrees; tilting your stake gives it a better stance in your horseshoe pit.
The stakes are set 40 inches apart and 21 inches away from the front of the box; about 15 inches of your stake should stay above the ground.
Can You Play Horseshoes on Grass?
A game of horseshoe can be played on almost any land surface. And although your lawn or grass is not the ideal surface for a horseshoe game, it can also be used if a horseshoe pit is unavailable.
To play horseshoe on grass, you will need to drive your stake into the ground using a mallet. Be sure that your stake has a firm stance before playing.
Where Do You Stand to Throw Horseshoes?
Your horseshoe, which is 4 inches wide and 8 inches long, should be thrown at the stakes at a set position. You should stand behind the foul line on the pitching ground to throw your horseshoes.
A foul line is made 27ft to 37ft from the stakes. The 27ft distance is suitable for women and kids, while the 37ft distance is best for adult males.
Conclusion:
The steps above show how easy it is to build a horseshoe pit in your backyard. Always remember to build your pit in an area where there are no individuals close by, as horseshoes are heavy and can cause severe injuries if not carefully used.
You should also observe other safety rules when building your frame and installing your stakes.
You should also have someone assist you when making your horseshoe frame of the box, and remember always to purchase the right material. With these easy steps, you can go ahead and enjoy a great game of horseshoe in your backyard.
You May Also Like:
- 5 Top Best Rated Ladder Ball Game Set
- How to Build a Bocce Ball Court on a Budget
- Slammo vs Spikeball Review – Which Should You Buy?
- Best Croquet Set To Bring Fun To Your Backyard
- How To Make a Wiffle Ball Field In Your Backyard?
- How To Install a Basketball Hoop on A Garage Wall or House?
- Top Safety Tips for Every Archer
We trust this article helped you learn how to Make a Portable Horseshoe Pit. You may also want to check out: What Age Is Appropriate for A Pogo Stick.
Thanks for taking the time to read our article, and we hope you find it helpful. Would you mind leaving a comment below if you have any suggestions?
Kindly reach out to people by sharing this post on social media.
If you liked this article, then please follow us on Facebook, Instagram, and Pinterest.