Archery is a recreational sport that makes you feel like an Amazonian warrior. Archery is all fun and games until the strings on the bow slap your wrist. When the strings keep slapping your wrist, it can eventually draw blood, which wouldn’t be nice.
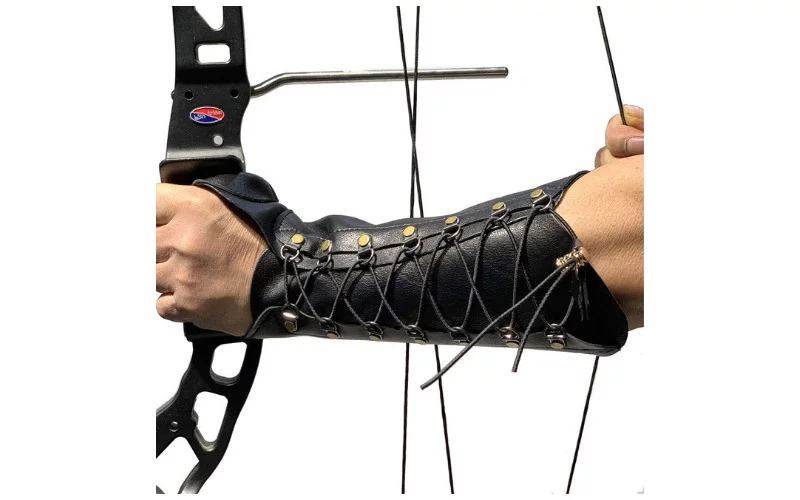
To prevent the strings of a bow from continuously hurting your wrist, you need an arm guard (also called braces).
Now, these braces can be costly and drain some cash from you. But why buy an arm guard when you can make one? That’s right. You can make your very own braces. Keep reading for a step-by-step guide on how to make an arm guard for archery.
What Are Arm Guards for Archery?
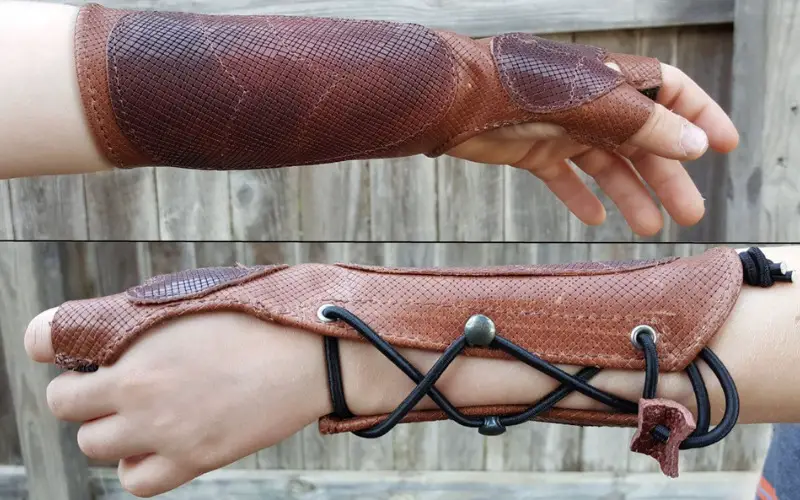
Archery arm guards (also called bracers) are protective wearables for an archer that can be made of several materials, including animal skin, leather, suede, polyester(600D), PVC, and others.
They protect the archers’ forearm from accidental whipping by the bowstrings, which may lead to a serious injury or a minor bruise on the forearm.
What Are Archery Bracers Made Of?
Archer’s bracers can be made from a variety of materials. They can be made of leather, stone, plastic, vinyl, smooth bark, suede, polyester, and animal skin (yes, animal skin, believe me, Lord Legolas arm guard from lord of the rings is still a thing).
Leather and animal skin are best suited to make an arm guard, as they are not only smooth but strong and breathable materials. However, we will not recommend them for people with sensitive skin as it can cause irritation.
Your arm guard should be light-weighted, comfortable, very easy to adjust, supportive, and free of restriction.
Are Archery Arm Guards Necessary
Yes, an arm guard is necessary for an archer to target more accurately and comfortably. All archers, both beginners, and experts can relate to a bowstring slap.
You see, a bowstring slap is inevitable and must occur more than once for an archer, so whether you are a Huntsman or an athletic archer, you need an arm guard.
Your bowstring slaps your wrist when it transits after a shoot, it can leave a bruise that will fade away with time, or it can leave a permanent scar which can also be an archer’s souvenir.
In some cases, these slaps are so severe that they can cause internal bleeding; if that isn’t enough reason to wear an arm guard, I don’t know what is.
Sometimes the pain stings so hard at times, and if it doesn’t, it just leaves a nasty scar on your skin from repeated slapping.
Also, arm guards prevent loose clothing from getting in the way of your bowstring. Not preventing all these can mess with the alignment of your arrow and can put you several inches off-target or off course.
Padded arm guards are also great absorbers of sweat during archery, so for those who don’t like sweat running down your forearm, an arm guard is great for you.
We suggest you wear an arm guard for protection for all types of bows and your level of experience; you will never know when something might go wrong.
Though you become more experienced in archery, you can reduce the length of the arm guard, but a long arm guard is recommended for beginners.
Recommended: How to Build a Backyard Archery Range (Complete Guide)
How To Make An Arm Guard For Archery – (Step by Step Guide)
Making an archery arm guard yourself is not all that hard and easy if you follow instructions carefully. Though you can make an arm guard out of different things—even a red plastic solo cup— we will guide you on how to use rubber.
Step One: Gather Materials and Tools Needed
It is essential that you gather all the materials and tools you need so you don’t end up running around when it’s time to make the arm guard.
We will be using leather that is thick enough to cover your arm properly. You can use your leather pants, skirt, or jacket for this.
You can use a shoelace, a bungee cord, or a drawstring. Whatever suits you. Lace hooks are needed for the strings to pass through, but they are optional as you can punch a hole through the leather for the strings to pass through.
To take measurements and mark them, a pen and paper are needed along with a measuring tape.
Materials and tools needed
- Fabric or material (Leather, suede, animal skin, PVC, polyester, and others)
- Strong.
- Lace hooks
- Pen or pencil.
- Sandpaper
- A punching tool
- A sharp blade or scissors
- Tape
- Pins
Step Two: Make A Pattern
There are two types of arm guards, a full-length arm guard and a standard-size arm guard. A full-length arm guard is usually 11 to 12 inches long and is highly recommended for beginners as it offers full arm protection.
Although they may restrict your movement, they prevent clothing from getting in the way of your bowstring.
A standard size arm guard is 7 to 8 inches long and can be worn by athletic archers. Those who feel confident that they can use a bow flawlessly don’t even need an arm guard.
But a standard size arm guard should be able to protect your forearm to some extent. Your arm guard should be able to properly cover your forearm to prevent a bowstring slap.
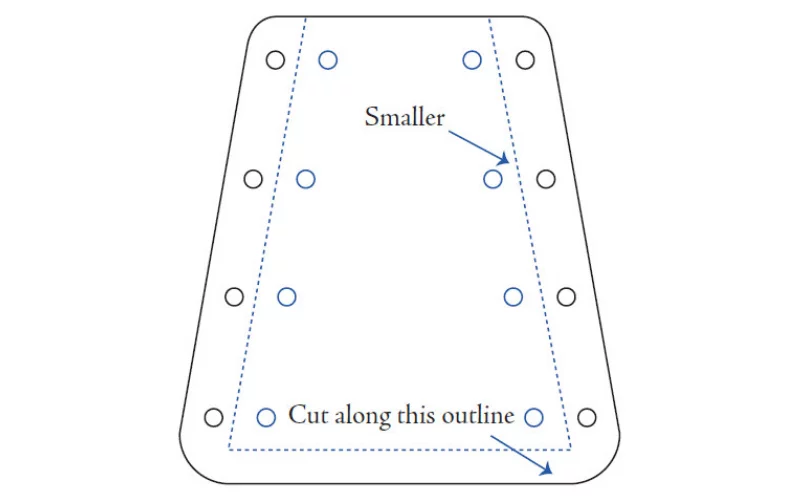
Take the measurements and draw out an outline using a pen or pencil. The measurement should be something that fits you perfectly.
We have included a diagram to help you get an idea of how the building process of your arm guard should look like so that you are on track.
Step Three: Cut Out the Template
Now that you have outlined your leather, polyester, suede, or whatever material you are using, use sharp scissors or blades to cut out what you have marked.
Be careful not to hurt yourself in the process. And make sure you cut carefully along the line you had traced with a pencil or pen and not cut off course.
Step Four: Smoothen Out the Edge of Your Material
After cutting, the edge of your material may be rough, and in some cases, may leave loose thread at the edges. Use sandpaper to make the edges smooth, or use some scissors to cut out loose threads, as they tend to make your work rough.
And hey, talking about improvising! You can use a nail file you don’t have sandpaper. The texture of a nail file is similar to that of sandpaper. You can also polish the edge of your material when you are done, but it is optional and not that necessary.
Step Five: Make Holes in Your Material
After smoothening and (optionally) polishing, you make holes on either side of your material (Not too close to the edge, though).
The template you had drawn earlier will make creating the holes easier. Use punch pliers to create the holes as it is easier and neater.
Another hack, if you don’t have a punch plier, is to use a nail (preferably a 6-inch nail) to boreholes in the material. But sometimes, using a nail may not provide neat work, so we highly recommend using a punch plier.
The holes for the strings should be just the right size. Small enough to let the strings pass through, but there would be a space allowance for the string to move freely in and out of the hole. The holes for the lace hooks should be bigger.
If you do not intend to use lace hooks, you can go on with your arm guard using just the strings to tie it up. This method is much easier, and we recommend it for people who have never worked with lace hooks before.
Different types of strings can be used; examples are:
- Shoelaces
- Bungee cords
- Drawstrings
- And others.
Step Six: Forming the Material
When using leather, you need to soak it in hot water and then constantly size it up around your arm. Do this until the leather fits perfectly around your forearm; if it fits, use a rubber band to keep it that way until it dries.
Doing this will make your leather take the shape of your forearm permanently. Not all materials need to go through this process, as some bend right away and fit your forearm.
For thicker leather, this step should be repeated multiple times.
Step Seven: Add Lace Hooks
You can use any lace hook of your choice. They are cheap and easy to get. But if you have a boot or a dress or clothing that is not useful, you can take out its lace hook and use it.
The idea is that you will pull the string through the hole from one side of the arm guard to the other. The hooks help to hold the arm guard in place, keeping it set on your forearm.
Though adding a lace hook is not compulsory, as you can still have a good arm guard with just punctured holes.
Step Eight: Lace the Rope
You can now lace the role through the loop. An arm guard 7 to 8 inches long will need 4 to 5 loops, while a longer arm guard will need 6 to 8 loops.
The whole looping process is quite simple, as it is the same way you will use a shoelace on boots or sport shoes.
Lacing the arm guard every time you use it is quite unnecessary, as you can loosen it a little, pull it off, put it on when next you use it, and tighten the strings.
Step Nine: Concluding the Whole Process
While some of you can go as far as adding a few decorative items to your arm guard, others might stop here. Either way, you should do whatever suits you.
Alternatively, you can use a hook and an eye, and using this doesn’t require you to puncture any holes or use shoelaces or any other strings. But if you are using a hoot and an eye, you will need a needle and a thread to sew it.
There are a lot of options when it comes to strapping an arm guard to your forearm; you can use a mini chest strap or a buckle strap. This is to let you know that there are other strapping options.
Some people may choose to use a hook and eye overusing cords and rope but using hook and eye will always require someone to latch it together. Plus, when using hook and eye, you cannot adjust the way the arm guard fits on your forearm (if you want it a little bit loose or tight).
Every other strap material has its pros and cons, including the use of cords. But it is way easier to use an arm guard with a cord than use one with a buckle or a strap or a hook and an eye.
Here is a cool video that also shows you how to make an archery bracer.
Conclusion
Making an archery arm guard (bracer) is quite simple, as it can be made from practically anything. We have also given reasons why it is necessary to wear an arm guard, plus an arm guard is a bit fashionable, with the right archery outfit.
A sports medical practitioner recommends wearing an arm guard to prevent a bowstring slap on your forearm or an archer scar.
Don’t risk your arrow flying off course by just making an arm guard out of the following materials, most of which can be found within your home.
You May Also Like:
- Is Slammo as Good as Spike Ball?
- How To Install a Basketball Hoop on A Garage Wall or House?
- What is Spikeball Similar to? – Which is the Closest Competitor to Spikeball?
- How to Build a Homemade Backyard Tetherball Set | Dimensions, Diagram, and Set Up
- Best Croquet Set To Bring Fun To Your Backyard – Reviews and Buying Guide
We hope this article helped you learn How to Make an Arm Guard for Archery. You may also want to read our article on How to Build a Backyard Archery Range.
Thanks for taking the time to read our article, and we hope you find it helpful. Would you mind leaving a comment below if you have any suggestions?
Kindly reach out to people by sharing this post on social media.
If you liked this article, then please follow us on Facebook, Instagram, and Pinterest.