Are you happy with the performance of your snowblower, or do you want it to drive faster, grip better, scrape snow better, or throw snow better?
Those features certainly worked flawlessly when you first received your snowblower, but after a season or two, their effectiveness may deteriorate.
This isn’t because a snow blower’s performance deteriorates year after year because it’s no longer brand new, but because some of its components or functions become out of adjustment.
So, before you get too irritated and call a snowblower repair service, try making a few simple tweaks to improve the performance of your snowblower.
Many snowblower performance difficulties can be resolved by following a few simple steps, and changes can be made in your garage with a few tools. In this article, you will learn how to adjust snowblower skids for gravel driveways.
Making A Snow Blower Scrape Better
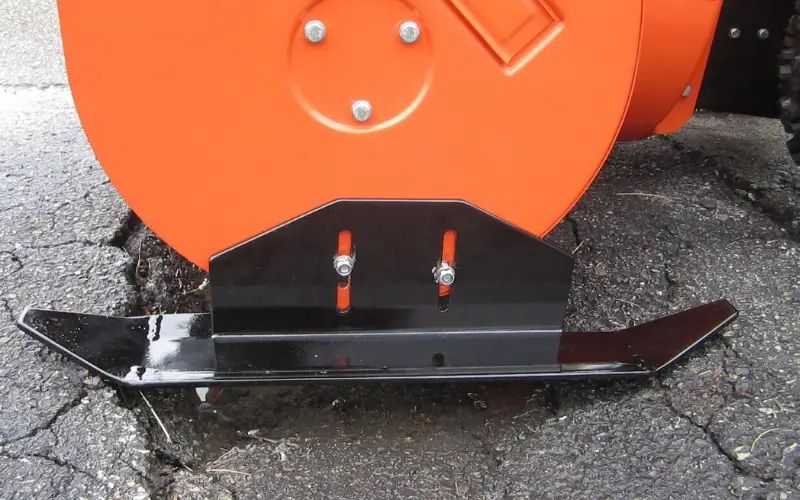
A scraper blade is located at the bottom of the auger housing on all snow blowers, both single-stage and two-stage.
This is the portion that scrapes snow from the pavement and other clean surfaces. The friction between the blade and the pavement gradually wears away the scraper bar material as it is used, and depending on the frequency of usage, the scraper bar could be worn out within just one or two seasons.
When the blade on your snowblower wears down too quickly, it fails to scrape all the snow from the clearing surface and leaves snow behind.
Spring-loaded scraper bars, popular on single-stage snow blowers, are self-adjusting and normally compensate for wear on their own, while scraper blades on two-stage snow blowers will require manual adjustment.
If the material on your two-stage snow blower scraper blade has worn down, adjust it to make better contact with your clearing surface. The following instructions are a condensed version of the procedures, instructions, and specifics in your unit’s operator’s manual:
- Carefully tip your snowblower back so that the handlebars support the weight of the machine.
- Secure the unit to prevent it from tipping back to its original position.
- At the bottom of the housing, loosen the scraper blade hardware.
- Pull the scraper blade as far down as you can.
- Tighten the hardware on the scraper blade.
After you’ve adjusted your scraper blade, go over how to adjust your skid shoes, and follow the steps. After adjusting the scraper blade, skid shoes will always need to be adjusted.
Adjust Snowblower Clearing Height
The skid shoes, which are two steel plates attached to the snowblower housing exterior, can be adjusted to modify the clearing height of a two-stage snowblower.
Lower the adjustable skid shoes on your snow blower to raise the height of the snowblower housing and the scraper bar for gravel driveways.
Clearing gravel areas or other surfaces with loose particles that you don’t want to take up with your snowblower requires a higher snow blower clearance.
The auger housing is lowered, and the distance between the scraper bar and the clearing surface is reduced by raising the snowblower skid shoes. For removing paved surfaces like asphalt and concrete, smaller snowblower clearances are recommended.
Skid shoes are adjusted to raise or reduce the height of your snowblower, but they’ll also need to be adjusted each time the scraper blade is adjusted to maintain an appropriate clearing height. To modify the snowblower skid shoes, do the following:
- Place a spacer between the scraper bar’s left and right sides.
- If you’re cleaning paved surfaces, use 1/8-inch-thick spacers.
- If you’re cleaning gravel surfaces, use 1/2-inch-thick spacers.
- Remove all skid shoe hardware and loosen it.
- Place skid shoes on the clearing surface.
- Tighten the hardware on the skid shoes.
Consider utilizing non-abrasive skid shoes instead of traditional steel skid shoes on fragile surfaces like brick or pavers. Some snowblower owners even claim that polymer or composite skid shoes help the machine spin more easily.
How to Adjust Snowblower Skids for Gravel Driveway
1. Adjust snowblower wheels
Underinflated tires can affect how well your snowblower drives and grips. A tire pressure discrepancy between the left and right tires may be causing your snow thrower to not drive during a line.
Check the pressure recommendation on the tire sidewall listed in PSI (pound-force per square inch). Inflate both tires to the proper pressures and make sure they’re equal in pressure.
2. Adjust Snow Blower Tracks
If the left and right snowblower tracks have different track tension, your equipment may pull to one side when driving.
The left and right sides of your snowblower track tension should be taught and equal, but if they aren’t, your snowblower will pull to one side or the other, needing adjustment with the track adjusters at the back of the track carriage.
Tighten the left track adjustment, loosen the right track adjuster, or use a combination of both if your snowblower pulls to the right.
Tighten the right track adjustment, loosen the left track adjuster, or use a combination of both if your snowblower pulls to the left.
3. Making Your Snow Blower Throw Further
One of two faults could be causing your snowblower not to throw as well as it previously did. It’s possible that the auger drive idler isn’t applying enough strain to the auger drive belt (on the inside of the machine), preventing the belt from gripping the auger pulley and turning it quickly enough.
Another cause could be a worn auger drive belt, which would result in the same consequence. In any case, a belt that isn’t gripping the auger drive pulley efficiently is frequently the cause of a snowblower not throwing well.
Adjust the auger clutch cable, the auger drive idler, or replace the belt to fix the problem. Belts wear out with time, so make the necessary modifications before replacing the belt. There are two methods for adjusting the amount of tension delivered to the auger driving belt:
4. Tighten The Cable That Connects the Auger to The Clutch
Engaging the auger clutch lever will not cause the auger drive idler to apply enough pressure against the auger drive belt if the auger clutch cable is slack.
Tighten the auger clutch cable to make the idler apply appropriate pressure against the auger driving belt:
- Check the auger clutch cable for slack. (From the right clutch lever to the rear of the frame, the auger clutch cable stretches.)
- Turn the cable adjustment barrel down until slack is removed by loosening the jam nut on the barrel.
- Place the jam nut against the adjustment barrel and tighten it.
5. Adjust The Idler Position of The Auger
If the auger cable is already taut or has recently been adjusted, the auger drive idler on the attachment arm under the belt cover may need to be repositioned.
When the clutch lever is engaged, simply moving the idler closer to the belt may be enough to provide appropriate belt tension.
Just keep in mind that before modifying the attachment idler position, you should check the idler arm roller clearance within the tractor.
How To Make Your Snow Blower Drive Faster
It’s possible that the friction disc within your snowblower has worn down, resulting in a loss of power to the driving wheels.
Friction disc wear is typical and expected, just like belt wear. As the friction disc degrades, it no longer makes as firm contact with the wheel drive pulley as it did when it was new.
Tension can be supplied to the traction/wheel drive clutch cable to compensate for friction disc degradation and make it touch the drive pulley more effectively.
The wheel drive clutch cable is adjusted similarly to the auger drive clutch cable.
The wheel drive clutch cable extends from the clutch lever on the left side of the snowblower handlebars to the back of the snowblower frame, which is the only change. To modify the wheel drive cable, do the following:
- Loosen the jam nut on the drive cable’s adjustment barrel.
- Reduce cable slack by turning the adjustment barrel down.
- Tighten the nut against the barrel of the adjustment.
Note that if altering the wheel drive cable does not enhance the drive performance of your snowblower, the friction disc may need to be replaced.
How To Adjust Snowblower Speed
Snowblowers are designed with pre-set driving speeds; therefore, the gear ratios of the snowblowers cannot be changed. It is conceivable, however, for those speeds to deviate from their fine-tuned modifications.
If your snowblower appears to be moving too slow or too quickly in one of its gears, make the following modification to the adjustment pin at the end of the shift rod:
- Through the back of the snowblower frame, disconnect the shift rod from the shift arm.
- Set the shifter or speed selector lever to the fastest forward position.
- Downshift as far as the shift arm will go.
- Rotate the adjustment barrel around the shift rod until the hole in the shift arm is aligned.
- Use the original hardware to reconnect the adjustment barrel/shift rod to the shift arm.
Adjust Snowblower Chute
Snow is directed to the place of your choice using snowblower discharge chutes. You may wish to adjust the chute location when you alter the direction of the snowblower.
The manufacturer has set up the cable-operated chute deflector, which is placed at the top of the chute. To work at peak efficiency, the chute cable may need to be adjusted over time.
With the simple mechanical ability and the right equipment, you can modify the chute cable in 15 minutes. You can check the snowblower’s instruction manual or check online to adjust the snowblower chute.
Conclusion: How to Adjust Snowblower Skids
When clearing snow from a gravel surface, the goal is to raise the clearance height of the auger housing to remove as much snow as possible while avoiding scattering gravel from your driveway all over your yard.
When clearing a gravel driveway, there is no set clearance height. Finding the clearance height that clears the most snow while leaving the gravel on your driveway will take some trial and error. It is preferable to begin at the top and work your way down.
On a gravel surface, regardless of the distance between the surface and the scraper bar, you’ll almost certainly pick up a few stones here and there.
Ensure your snow blower’s discharge chute is pointed away from anyone or anything you don’t want to hurt. If gravel gets into your snow blower and out the chute, it can be thrown twice as far as snow.
You May Also Like:
- Ryobi Snow Blower vs Ego Snow Blower Reviews – Attachment Video and Assembly Instructions
- Factors to Consider When Buying a Snowblower for Gravel Driveway
We hope this article helped you learn how to adjust snowblower skids for gravel driveway. You may also want to discover How To Find Amethyst in Your Backyard.
Thanks for taking the time to read our article, and we hope you find it helpful. Would you mind leaving a comment below if you have any suggestions?
Kindly reach out to people by sharing this post on social media.
If you liked this article, then please follow us on Facebook, Instagram, and Pinterest.
Cheers!
www.backyardcaring.com
How to Adjust Snowblower Skids for Gravel Driveway