Archery has been in existence since the middle stone age, approximately 20,000bc ago. It dates to ancient Egypt and ancient China, as they used archery as a form of self-defense.
Archery today can still be used for defense, but it can also be used for hunting and sport purposes.
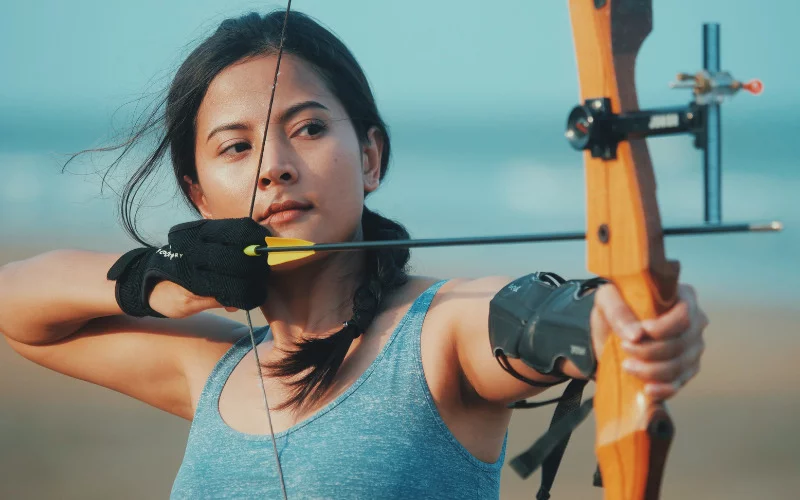
We will be discussing archery bracers, protective gear worn on the forearm when using an arrow, and a bow. We will guide you through the steps on how to make an archery arm bracer.
How Do You Make a Leather Arm Guard?
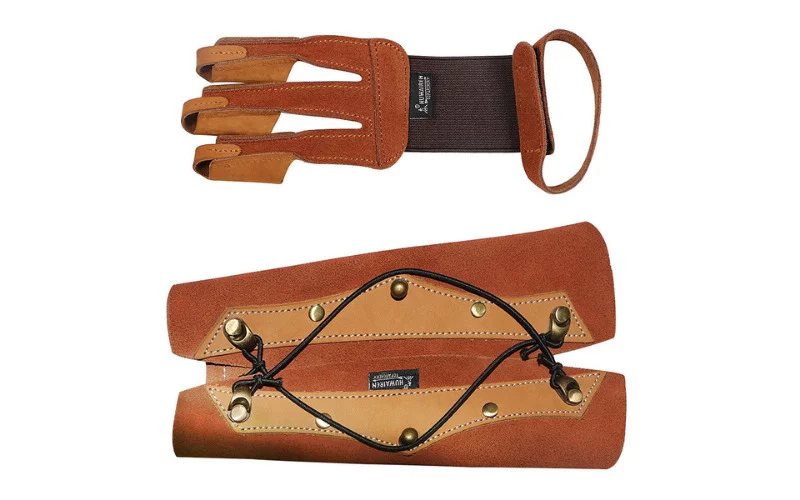
Leather is one of the best materials you can use to make an archery arm guard; it provides extra padding that gives your forearm just enough protection from bruises obtained during archery.
To make a leather brace is very easy; if you understand the whole concept, you can easily get your hands on the materials needed to make a leather arm guard. We will provide you with simple steps on how to make an archery brace.
Note: If you want to Make an Archery Arm Guard, Consider Building Backyard Archery Range Backstop for your training.
Step 1: Gathering Your Materials for Archery Arm Bracer
You will need the following to make a leather arm guard
- Leather
- Scissors or blade
- Tape and a pen
- A puncturing tool.
- Strong (preferably a shoelace)
- And a smoothening tool.
Step 2: Make a Pattern
Your leather arm guard should be 5 inches wide and 8 inches long. Draw out a pattern on the leather, including the position of the holes. Be sure that the measurement suits your forearm.
Step 3: Cut Out the Pattern
Now that you have a template, use scissors or a sharp blade to cut it out. Be careful not to cut yourself while cutting out the leather.
Step 4: Smoothen the Edges of The Leather
Using a material like sandpaper, smooth out the edges of your leather as it tends to get rough after cutting.
Step 5: Make Holes on Your Leather
Using a nail, make about 5 to 6 holes on either side of your leather. Although using a nail might not provide neat work, another alternative is a punch plier. Make the holes big enough to accommodate your shoelace.
Step 6: Forming the leather
If your leather is thin, you will not need to go through with this step. If your leather is thick, you need to soak it in hot water and wrap it around your forearm so it will permanently take on the shape of your forearm. After soaking and forming, allow your leather to dry overnight.
Step 7: Lace the Cord
Pass your shoelace through the holes made earlier. You can choose to tighten it on your forearm or let it be a bit lose.
Unlacing the brace when done is unnecessary, as you can loosen the shoelace and let the bracer pass through.
With these easy steps, you should make a good arm guard out of leather and a shoelace.
Do You Need a Bracer for Archery?
Yes, an archery bracer is a very important protective gear. For archers of all levels, your forearm may occasionally get slapped by the bowstring. The bruise leaves stings: sometimes, it may lead to a fracture when the slaps get serious.
It also prevents the loose sleeves of your clothing from tangling up with the bowstring.
How Do You Make An Archery Arm Bracer (simple guide)
Here is a guide to follow when making an archery bracer out of any material or fabric that isn’t leather.
1. Take measurements.
The first step towards making a good archery bracer is taking the right measurement. The height of an archery bracer ranges from 7 to 12 inches, and its width ranges from 3 to 9 inches.
2. Make a pattern
Using a pen or a pencil, neatly draw out an outline that matches your forearm measurement on the material you are using.
3. Cut out the pattern
Using a pair of scissors or a sharp blade, cut out the outline you have previously drawn. We suggest you use a sharp blade as it accurately cuts out the outline with little or no mistakes.
4. Smoothen (if necessary)
Just like leather, some materials may need smoothening. Look for rough edges after cutting to detect a material that may need to go through a smoothing process.
5. Make holes
Making holes is essential when using a string. Use a nail of reasonable width to puncture holes in your material. But a punching power is best suited for this job as it can make holes in any material, including plastic.
6. Attach lace hooks (optional)
If you want, you can attach lace hooks to make your arm guard looks fancier. But it’s not necessary. You can also choose other strapping options that may be best for you.
7. Lace the string/cord
Lace your cord through the holes you have made earlier. For other strapping options, sew the strap properly and buckle.
What Are the Eleven Steps in Archery?
1. Stance
We will discuss the appropriate stance and posture required to help you make a shot.
- Place one foot on either side of the shooting line.
- Your feet should be some width apart, and your toes should be lined up on an invisible line.
- Tighten your lower abdomen.
- Stand straight and tall; your body should be relaxed
2. Nock
This is the correct way to position your arrow on your bowstring. Note that the index fletch has a different color, and all the other fletch has the same color.
- Straighten your bow and place the nock of the arrow on the bowstring.
- The odd color of the fletching (the feathered end of the vanes of the arrow) should be facing the archer.
- Be conscious of whoever stands beside you.
3. Set Draw Hand
This shows the right way to position your drawing hand.
- The three middle index fingers should be set below the nock in the archer’s groove on your commanding hand.
- The draw hand, thumb, and pinky finger should be held together facing down flat.
*The string SHOULD NEVER BE in the knuckle valley of the fingers.
4. Setting your bow hand
This is the proper placement of the hand holding the bow.
- Place your hand on the bow grip (the pivot spot). The curve between your thumb and your index finger should be positioned in the center of the bow grip.
- The knuckles of your draw hand should be positioned at a 45° angle.
- Your thumb should point forward at the rim of the grasp.
- Your index finger can be wrapped towards the front of the bow, but it should also be relaxed.
- Your bow hand should remain to lose and relaxed throughout the whole target. Avoid clenching your hands while it holds the bow. Even after releasing the arrow, your bow hands should be relaxed.
5. Pre-Draw
- Start with your draw hand dangling loosely at your side.
- Raise your bow arm and your draw hand towards the target, and your bow arm should be raised at eye level, and your shoulders should be set.
- Look at the target over the tip of the bolt.
- Rotate your bow arm elbow at a distant level away from the bowstring (to avoid bow string slaps)
- The elbow of your drawing hand should be above your nose.
- The position of your bow hand and draw hand should be parallel to the floor.
6. Draw
- With the draw hand and elbow parallel to the floor, pull the string towards the right side of your face (for left-hand users, pull the bowstring towards the left side of your face.
- Position your drawing hand a little bit higher than your bow hand.
- Maintain a smooth movement throughout the shot.
- Use your lower back, and keep your neck always relaxed.
7. Anchor
- Pull your bowstring toward yourself in such a way that your index finger is touching your mouth.
- There are different anchor points; it will be helpful if you can identify your own. Keeping your nock in place should help you find your anchor point.
- Your muscles should be active and highly engaged in this process.
8. Aim
- Align your vertical bowstring with the arrow position of the target.
- Use your dominant eye and keep the subordinate eye closed.
- Some compound bows come with peepholes, look through the peephole and align the arrow
9. Shot Set-up
- Utilize your back muscles and DO NOT drop your elbows
- There should be a slight movement in your shoulder, nearly like a shoulder shrug
10. Release
- Ease up your fingers at once and let the arrow fly loose, though after your shot or may feel like the arrow fell off, but don’t worry.
- Continue expanding the bow arm towards the objective as you discharge.
- Continue concentrating on the objective.
- Fingers of your draw hand ought to remain together.
11. Follow-Through and Reflect
- Your draw hand thumb should be able to nearly touching your shoulder.
- Your back muscles should be engaged, and your shoulder should roll towards your back.
- The elbow should relax and fall downward
- Analyze the shot you just made, reflect on any mistake and work towards correcting it.
Did Medieval Archers Use Arm Guards?
Yes, medieval archers did use arm guards. These military soldiers use arm guards to protect their forearms from (you guessed it) now strings slaps. No one, even the medieval archers, wants a nasty bruise on their forearm.
Conclusion: How to Make an Archery Arm Bracer
Now you know who uses arm guards and why they are indispensable for archers. We also looked at the eleven steps to successful archery.
These eleven steps discussed above are beginner-friendly; as you advance, you can have an in-depth look into the eleven steps, and you can fully understand everything.
You know the basic steps to making a leather arm guard and an arm guard made from any other material.
Interestingly, the tough medieval archers used arm guards to protect their forearms, so you should wear an arm guard while shooting.
You May Also Like:
- How Do You Make an Arm Guard for Archery? (9 Easy Steps)
- How To Install a Basketball Hoop on A Garage Wall or House?
- How to Build a Backyard Archery Range (Complete Guide)
We trust this article helped you learn How to Make an Archery Arm Bracer. You may also want to learn How to Build a Backyard Archery Range.
Thanks for taking the time to read our article, and we hope you find it helpful. Would you mind leaving a comment below if you have any suggestions?
Kindly reach out to people by sharing this post on social media.
If you liked this article, then please follow us on Facebook, Instagram, and Pinterest.
Cheers!
www.backyardcaring.com
How to Make an Archery Arm Bracer