Tilling the ground is a very stressful and time-consuming aspect of gardening that many people dread; however, with the different types of machinery readily available, tilling the soil is now less labor-intensive and time-consuming.
A front tine tiller is one gardening machinery that eases the fatigue associated with working your garden. A front tine tiller has its tiller attached to the front of the machinery. Using this tiller is quite simple, even for beginners.
Today we will show you how you can use a front tine tiller to till your garden, why you will want this unit instead of its rear tine counterpart, and what to look out for in a front tine tiller.
What Is Front Tine Tiller?
A tiller is a rotating tool with spokes called tines. These tines rotate into the ground and dirt in your garden, loosening and digging up the soil and grass or plants you have there.
A front tine tiller is a tiller that has its tines at the front of the machinery, and you stand behind it and walk with it, pushing it forward with a handle, like you would with a lawn mower.
Features Front Tine Tiller
Some qualities clearly distinguish the front tine tiller from other tillers, and these qualities include:
1. Where The Tine Is Positioned
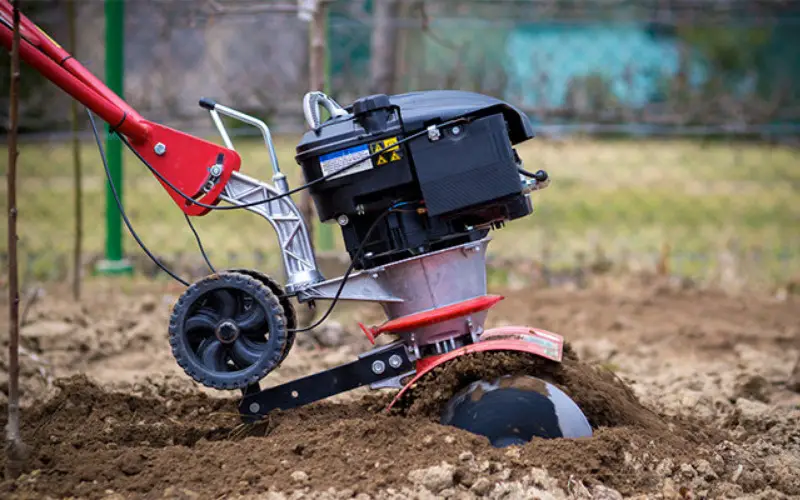
The obvious characteristic of a front tine tiller stems from its name, indicating that the tine is exposed at the front of the machine while the wheels are at rest.
2. The Engine Size
The engine of most front Tine tillers are either small or medium-sized, and they are less heavy and powerful than their rear counterpart. Their engines, too, are mounted directly above the tine.
3. The Size Of The Machine
Front tine tillers are usually smaller in length and width, making them very transportable and storable. The disadvantage of their size is that it takes a little longer to till a given area, especially when compared with rear tine tiller.
4. The propulsion
The rotation of the front tine tiller is forward, which means that the propulsion causes the entire machine to move forward.
5. They Have Short Tines
Because of the shortness of the tines of front tine tillers, they cannot till soils too deeply; hence they are best suited for tilling shallow soils and established beds and removing weeds from the soil surface without removing them from their roots.
6. Difficulty With Working Rocky Ground
Tillers of all kinds are not engineered to break through lumps of concrete or rock grounds and should never be used for that purpose. Due to its strength, rear tine can easily break up Rocky soil.
Front tine tillers are much lighter and will not easily break up rocky soil. Removing all hard rocks in the soil is best for all kinds of a tiller, as they can damage the machine.
7. Maintaining established beds
Front tine tillers are a great choice for gardening activities like removing surface weeds, turning the soil, and mixing compost, which is because of their short and narrow width.
8. Cost
As expected, the front tine tiller is relatively cheaper than the rear tine tiller, all thanks to its engine and size, which is quite smaller.
9. The Drag Bar
Even though not all front tine tillers have a drag bar, most of them do, and this feature runs behind the tiller, and its function is to slow down the tiller so that the soil gets thoroughly tilled. This drag bar also helps the tiller to till the soil at a consistent depth because it can be set at the given depth that you want
10. They have Large Wheels
Front tine tillers have large wheels, making them easy to maneuver, especially along driveways and sidewalks as you walk to and fro the area you want tilling.
Preparing To Use a Front Tine Tiller
If you have never used a front tine tiller, you might wonder if it is a difficult machine to operate. The truth is that using this machine is very simple, but there are few preparatory steps you have to take, including
1. Clear The Area
As we stated earlier, front tine tiller or any other tillers are not designed to break very hard materials like rocks, strong roots, and large stones; hence the first thing to do is get rid of all such materials that will not only constitute a tripping obstacle to you but can also damage the tiller. Hence all rocks, trees, and all such materials should be removed from the ground.
2. Dress Properly
Whenever you use any machinery, you must dress to protect yourself during your operation.
Before using a front tine tiller, you should wear clothing that will not get caught in the machine. You should protect your eyes from small stones and dirt that might be flying around during the tilling by wearing goggles or eye defenders.
You should also wear good shoes, preferably tough and sturdy shoes that are comfortable and gives good traction because it is non-skid.
3. Mark The Area
To ensure that you don’t till areas you don’t want to, you must mark out in advance the area you will be tilling. You can use a rope to mark out the borders of the area to be filled.
4. Plan The Tilling Depth.
Most front tine tillers come with a depth gauge with which you can adjust the depth of the soil to be filled. Adjusting the depth to which you till the soil will ensure that the soil is filled to the depth where you can get rid of some plant roots and mix organic materials properly while ensuring that the root of the Plant to be planted on that ground will get adequate Anchorage and nutrient.
5. Ensure Kids Steer Clear
Before you use your front tine tiller, ensure that there are no kids or pets around, this is to avoid any form of accidents and to also ensure that you concentrate on what you are doing.
How To Use a Front Tine Tiller
The steps below will show you how to use a front tine tiller:
Step 1: Start The Tiller
How you start the tiller depends on the unit you have; if it is a battery-powered machine, hence all you need for us to switch the power on and then engage the tines.
You must, however, ensure that you have a good grip on the machine because sometimes it can be quite erratic when you start the machine.
If, however you are using a gas front tine tiller with a. 4-stroke engine, then you will have to engage the choke and open up the throttle to halfway, after which you pull on the recoil handle or rope carefully yet firmly.
If it does not start on the first try, you must pull the handle or rope again until the engine starts. Once the engine starts, return the choke lever to its original position. Allow the engine to rev for seconds before opening the throttle and engaging the tines.
Remember that as the engine comes on, the tiller will sharply move forward to start tilling, but you must hold the handle firmly to gain control of the tiller.
Step 2: Allow The Tiller To Move Forward
As you open the throttle, The speed of the front tine tillers will increase. It is best to use the machine at that high speed because it makes the tilling go faster even though it might be slightly more difficult to control, and that is why as you squeeze the engagement handle to engage the times, you must hold the handle firmly.
A good tip is to ensure that you are wearing a comfortable glove while holding the handlebars. If not, ensure that your hands are not sweaty, so they don’t get slippery.
You keep pushing the tiller, moving smoothly and carefully, and if it stops moving, wiggle the tiller gently from one side to the other while still moving forward, and it will start moving again.
If the unit you are using has a reverse gear, you can use it back and forth to get to spots you might have missed.
Step 3: Start In One Corner
When using the front tine tiller, it is important to work carefully and meticulously as this makes for efficiency. It is always best to start in one corner and work your way down the long way first.
Working over a longer route for areas that are not square is advised, and you must till the soul row by row to ensure that all the ground is properly tilled.
Step 4: Make Multiple Passes
You should not take just a pass over the area, but make at least 2 or3 passes so that you can be sure that the soil is perfectly tilled.
If you moved perpendicular in the first pass, you could move in the opposite direction this time to ensure that all the clumped soils are completely broken up to get an even tilt.
Step 5: Turn Off And Clean Up
If you are satisfied with how fine the soil is, you can go ahead and turn off the engine of the tiller and then clean off every dirt, grease, or organic material left on the tiller; this ensures that the tiller remains free of corrosion and damage. You can now store it in a cool and dry place.
Best Front Tine Tiller You Will Find
There are so quite several front tine tillers that you will find available, but we have taken the liberty of picking a few of the best in the market, and they are:
1. TACKLIFE TGTL02A Classic Tiller
This is a powerful electric front tine tiller whose 12-amp motor is so efficient that it can make 400 per minute. The tilling width is 16 inches and can till to a depth of 8 inches.
It is storable and transportable because its handles are foldable and it has a transport wheel. One of its selling points is the fact that it is inexpensive.
2. Earthquake 20015 Versa Front Tine Tiller
This tiller comes with a powerful 99cc, 4-stroke engine that can easily break up most soil types into a finer tilth. This unit is very stable because of how compact it is. This front tine can also serve as a cultivator, and you can easily maneuver it around.
3. Tazz 35310 2-in-1 Front Tine Tiller
This front tine tiller cum cultivator has a 79cc engine has a tilling width of 21 inches, even though it can be adjusted to tilling width.
This front tine tiller’s height can be adjusted to suit any user’s height in that you are comfortable as you push the tiller. One of the reasons many people love this unit is because of its stability and durability.
4. Champion 100379 Dual Rotating Front Tine Tiller
This powerful front tine tiller can handle almost all soil types because it is built strong and durable. This tiller has a 4-stroke and 212cc engine capacity and a tilling capacity of 16 to 22 inches which means that you can get the job done much faster with this tiller.
It has tines almost 14 inches high and can easily till to a depth of 8 inches. However, this tiller is a little pricey, but it is worth it.
Conclusion
If you are like everyone who loves a lush lawn or a beautiful garden, you will realize that one of the things you need to do to achieve it is to have well-tilled soil before growing your grass, vegetables, and flowers, and this is what a front tine tiller does.
This machine, whose tines are positioned in front of the machine, is easy to use, maneuverable, and relatively cheap, making it a must-have in every home.
Helpful Links:
- How to Kill a Palm Tree
- What Does Soil Conditioner Do
- How To Propagate Monstera Adansonii
- How to Grow Brussel Sprouts in Containers
- How to Make a Rock Garden Without Weeds
We trust this article helped you learn how to use a front tine tiller. You may also want to check out How to Rototill a Yard.
Thanks for taking the time to read our article, and we hope you find it helpful. Would you mind leaving a comment below if you have any suggestions?
Kindly reach out to people by sharing this post on social media.
If you liked this article, then please follow us on Facebook, Instagram, and Pinterest.