If you are a homeowner or a gardener, you want rich and healthy soil for growing your flowers and veggies.
Tilling the soil before you plant any of these plants is essential, and there is one machinery that can make tilling less of a chore: The rototiller.
There are different types of rototiller, from the one mounted behind a tractor to those self-contained; they all perform the same function.
Asides from tilling the soil, your rototiller comes in handy in leveling the soil. For more on how to use this gardening machine, just read along.
What Is A Rototiller
A rototiller is farm machinery powered either by gas or electricity that is used for breaking up and loosening the soil to make them fit for plants to grow on them.
They come with turning blades that turn and mix up the soil while at the same time pulling up weeds, small roots, and grasses on the soil.
You can use a rototiller to mix in green manure in the form of a cover crop that will help replenish the nutrients lost from the soil.
Soils can get compacted due to being left fallow for a long time, heavy floods, movement on the soil, or even matted roots of plants. Whatever the cause of the soil compaction, a rototiller will break it up, creating enough space for air and water to infiltrate the soil.
READ: Should You Use Leaf Blower For Snow Removal
Types Of Rototiller
There are a variety of styles and types of rototillers that are available, but they all perform the same function. Here are the basic types of rototillers that there are:
Manual Rototiller, or Hand Tillers
This is the type of rototiller where the source of power is manual, and the machinery consists of a bladed wheel, a long handle, and a set of prongs it spikes.
As this rototiller is pushed, the spikes work to dig up the soil, while the wheel helps to churn and mix up the soil.
Manual rototillers are best used to mix fertilizers, peat moss, or mulch into the soil, dig weeds, and aerate the soil.
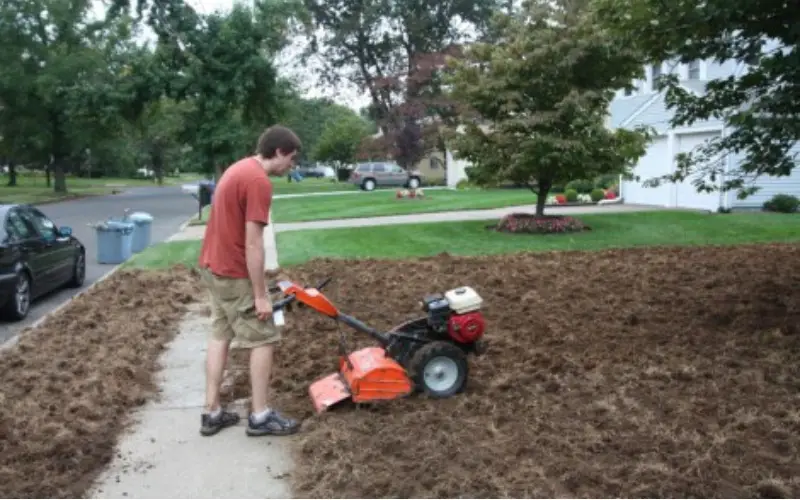
Front Tine Rototiller
Home gardeners commonly use this for tilling and mixing up the soil, and one of its main advantages is that the tine width can be adjusted. Some models come with three-width settings that can fit into most space ranges.
As the name suggests, the front tine rototiller has its wheel at the back of the machine, making it easier to turn and reverse the machine. This unit is ideal for digging a small to medium-sized garden, loosening the soil, and generally maintaining the garden.
Front tine rototiller comes in 2 different types: the standard rotating tines, which are the ones that rotate in the same direction as the wheel, and because of this, they don’t get deep enough into the soil, and there are those with forwarding rotating tines which are powerful and can dig deeper into the soil.
Mid Tine Rototiller
This is the type of rototiller whose tines are located under the machine’s engine. This makes it very balanced, maneuverable, and of better economic value than the front tine model. They are used for digging home gardens, loosening soils, shallow weeding, and general maintenance. They are
Rear Tine Rototiller
These are generally large machines ideal for use in farms or large gardens because they are heavier and produce more power. These tillers are not so easy to maneuver since the steering of the machine is a lot harder than the other types of rototiller.
You use these tillers to break up hard soils like rocky soil. And their tines work independently while their wheels move the machine along, making this unit an easy tiller to use.
Vertical Tine Tiller
This is a new addition to the tiller family of machinery, so they are not very common; they are unique in how they cut through the soil, unlike the others that cut downward. Hence vertical tine tillers are very fast and easy to operate.
These rototillers are used mostly for breaking the grounds of a new garden and loosening the soil, but you have to use these tillers carefully so that it doesn’t destroy the soil.
READ: How to Kill a Palm Tree
Pros And Cons Of Using A Rototiller
To till or not to till is a hot debate that has been raging among gardeners for a while now, and no side seems to be backing out.
We, however, present to you some of the advantages of using your rototiller to till your garden and some of its demerits, and you can decide which of the argument you favor:
Merits Of Using A Rototiller
1. Rototillers are very important machinery in the weapon of a professional farmer, which they use in spring and fall to increase the air in the soil, thereby stimulating the aerobic microbes that are beneficial to the plants and the entire ecosystem.
2. Rototiller can be used to amend the soil in fall because when you till the soil with your rototiller, you add organic matter, which decomposes and releases nutrients to the soil.
3. Rototillers loosen the hard and compacted soil, allowing a plant to grow in them and allowing more water to percolate in them.
4. A rototiller can be used to remove weeds from the soil, and we know that these weeds are responsible for depleting some of the nutrients in the soil that our plants need.
5. Using a rototiller to till the soil can help eliminate pests of plants like insects and soil-borne larvae; these pests are also carriers of plant diseases.
Demerits Of Using A Rototiller
1. Rototillers are not cheap, and some are pretty pricey.
2. Some of these rototillers are so technical that it will take a new user some time to get used to it
3. Using a rototiller can destroy the soil structure of your garden, especially when you use it too often on a given soil. It can compact the soil if used too frequently.
How to Rototill a Yard
Below are steps on how to rototiller a yard:
1. The first thing to do is to prepare the land for tilling by removing excessive plants, sods, and weeds; this is because you don’t want old plants, especially weeds, to get tilled into the soil where you will be planting your new plants. You can, however, leave dead plants on the soil since they will serve as mulch which will later decompose and add nutrients to the soil.
2. You don’t want your rototiller clogged or damaged by large stones, rocks, and other hard materials. Hence these obstructions should be removed from the soil.
3. The next thing to do is to test your soil to evaluate its true condition and ensure it is the best growth medium for your plant. The soil type and pH are 2 of the most common test to be conducted on the soil. You can take a sample of your soil to the local agricultural center around you for testing.
4. If the soil test shows a need for soil amendment, then the appropriate measures should be put in place to fix the soil. Very simple organic and inorganic materials can be added to the soil to correct any challenge revealed by the soil test. However, you can add some organic compostable and organic matter to the soil, whatever the case may be, to improve the soil.
5. At this stage, when you have finished all the necessary soil preparation before, you can now face your rototiller. The first thing to do is to set the depth adjuster, but if you have the front-tine rototiller, then you needn’t bother with this adjustment since there is a metal part that slides behind the tines that control the depth. You can keep track of the depth by moving the depth adjuster up or down. For the first, till you don’t want too deep a till, the depth adjuster should be up.
6. Protect yourself with personal protection and safety equipment, including sunglasses, heavy steel boots, long sleeves, a trouser, and other stuff.
7. The next thing you do is turn the rototiller on using the switch at the engine; this will not immediately cause the engine to rev.
8. You now open the throttle to allow the fuel into the engine. Since the rototiller is most likely to have a rabbit and turtle on the throttle to indicate the position, you will have to push the lever to the rabbit to open the throttle and then start the rototiller.
9. The choke is a valve that controls air intake in the rototiller engine, and to start the engine, you engage the choke and close the valve so that the engine gets a richer supply of fuel.
10. At this point, you pull the cord to start the engine, find the recoil start on the engine and hold the handle and then in one motion, pull back k in one motion to start the engine, try the pulling the cord the second time if the engine didn’t start the first time. Immediately the engine starts, you disengage the choke.
11. Once the rototiller has started, pull up the levers under the handle and squeeze it to get the tines to turn. If the tine of your rototiller is in front, you can stop the tiller from moving forward when the tines are engaged by pulling back on the handles while pushing down to lift the tines out of the soil and keep the machine in place.
12. If you want to move forward as you till the ground, then raise the handles upwards so that the times tip downwards, and as you push the time into the ground, the soil will get churned. To ensure that you till the soil at the same depth, walk at your normal pace. The rototiller will continue to break and loosen up the soil they contact once the tiller pulls itself forward.
13. To move from one end of a row to another, push the rototiller forward in a curving motion to get it to turn around. When you are done tilling a row, your best bet is to till the second closest row because it will be slightly difficult to till the row directly close to you if you use a backyard rototiller.
14. The moment you have gone over each row and tilled the entire area once, repeat the same process but this time in the opposite direction. For example, if you tilled in vertical passes the first time around, do horizontal passes the next time. By alternating your direction and making two passes with the tiller, you will be sure that you have fully till all the soil.
15. When you are done tilling the whole ground, you release the levers under the handles to prevent the tine from moving, and then you flick the switch to turn the engine off.
If you are using a manual rototiller that dies not have a motorized engine, all you have to do to start the engine is to push the blades or spikes into the soil to a depth of between 6 and 8 inches (15 and 20 cm).
If the tiller has a bladed wheel, you will have to push it forward while it’s in the ground; this will cause the blades to rotate and till the soil.
If the rototiller does not have a wheel, twist the tiller as you pull it straight out of the ground. Afterward, you move the tiller to another land area, insert the spikes, and repeat the process.
READ: What Does Soil Conditioner Do
Watch the Video Below to Learn How to Rototill
Conclusion
Tilling your garden can be a tough chore, but with a rototiller, you can reduce the struggle associated with tilling your soil.
There are many benefits that your soil and plant gain from using a rototiller to till your soil, including aeration and loosening of your soil, helping to mulch and add nutrients to the soil, amongst other things. Using a rototiller is very easy, so there is no reason why you shouldn’t get one for yourself
Helpful Links:
- How to Kill a Palm Tree
- What Does Soil Conditioner Do
- How To Propagate Monstera Adansonii
- How to Grow Brussel Sprouts in Containers
- Top 3 Best Bagged Soil For Vegetable Garden
We trust this article helped you learn how to rototill a yard. You may also want to check out How to Make a Rock Garden Without Weeds.
Thanks for taking the time to read our article, and we hope you find it helpful. Would you mind leaving a comment below if you have any suggestions?
Kindly reach out to people by sharing this post on social media.
If you liked this article, then please follow us on Facebook, Instagram, and Pinterest.